BUILD A QUERY
To demonstrate how to use the calendar tool, we’ll use a sample database that contains delivery information. Create a query named “qCalendar_Deliveries.” To make the data understandable for the calendar tool, query fields need to be assigned specific aliases (names): CalDate is a required field that contains the important dates for the calendar. CalTitle is the calendar title. Since only one calendar is being created, the value in CalTitle will be the same for every record. Finally, there can be up to three text fields that contain the information to include with each CalDate. These are called Text1, Text2, and Text3.

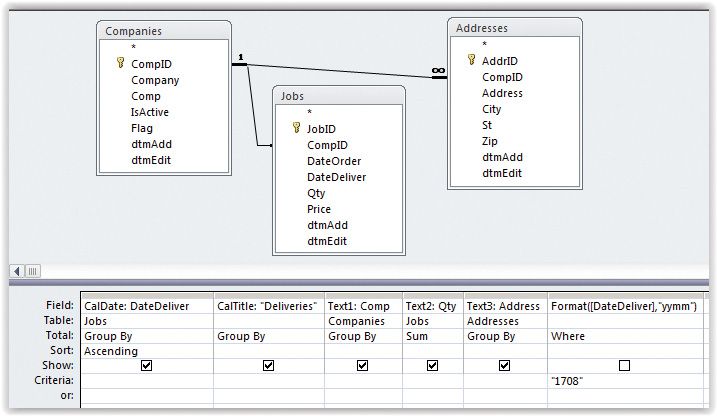
Figure 1 shows how the field names are used in the query design. In this example, the query contains three tables from which to draw data. The first step is to establish the aliases that the calendar tool will recognize. In the first column, “CalDate: DateDeliver” specifies that the DateDeliver field in the Jobs table will be the CalDate field. Note that the data for CalDate must be sorted in Ascending order to get the expected results. The calendar will work if you forget the sort, but it will probably be missing data.
In the next column, “CalTitle: Deliveries” assigns the calendar name. While this is using a literal string, you also can use a formula to generate the name you want. The next three columns assign the Text1, Text2, and Text3 aliases to identify the appropriate data. In our example, the fields include specific information about the deliveries, like the company code, quantity delivered, and address of the delivery.
Because the calendar only shows one month, the final field is included to limit the dates in the query to the month of August 2017. The calendar tool itself will ignore this field—or any other field that doesn’t reference any of the five specific aliases.
By having you assign the aliases for the calendar fields, the tool gives you complete flexibility to show exactly what you want in the calendar. Save and close the query.
IMPORT THE TOOL
The calendar tool is composed of a module and two macros. To get the tool, download the zipped database file from http://bit.ly/2v7oG1V. (Seasoned developers and MDB users can download the zipped BAS file instead.) Move the database out of the zip file, saving it in a folder that you can navigate to easily. Then import the module to your current database:
- In your current database, go to the External Data tab and click on the Access button in the Import & Link group.
- In the dialog box, click Browse to locate the downloaded database. Select that file and press Enter or click Open to continue.
- In the Get External Data dialog box, chose “Import tables, queries, forms, reports, macros, and modules into the current database.” Click OK.
- In the Import Objects dialog box, click on the Modules tab and select mod_HtmlCalendarReport_s4p.
- Go to the Macros tab and select both macros listed: mcr_CALENDAR-From-Query and mcr-OpenCalendarFolder.
- Click OK to import.
Now that code has been imported, it needs to be compiled. Press ALT+F11 to go to the Visual Basic Editor (VBE). From the menu, choose Debug, Compile [project name]. Assuming there are no errors, choose File, Save [project name]. (If there are errors, offending statements will be highlighted, and you’ll need to fix them.) Close the VBA editor.
CREATE THE CALENDAR
In the Navigation Pane, right-click the qCalendar_Deliveries query and select Rename. When the query name is highlighted, press CTRL+C to copy the text. Then press ESC to cancel the renaming.
Next, double-click the mcr_CALENDAR-From-Query macro in the Navigation Pane. A prompt will appear asking for the name of the query. Simply press CTRL+V to paste the exact name of the query. Click OK.

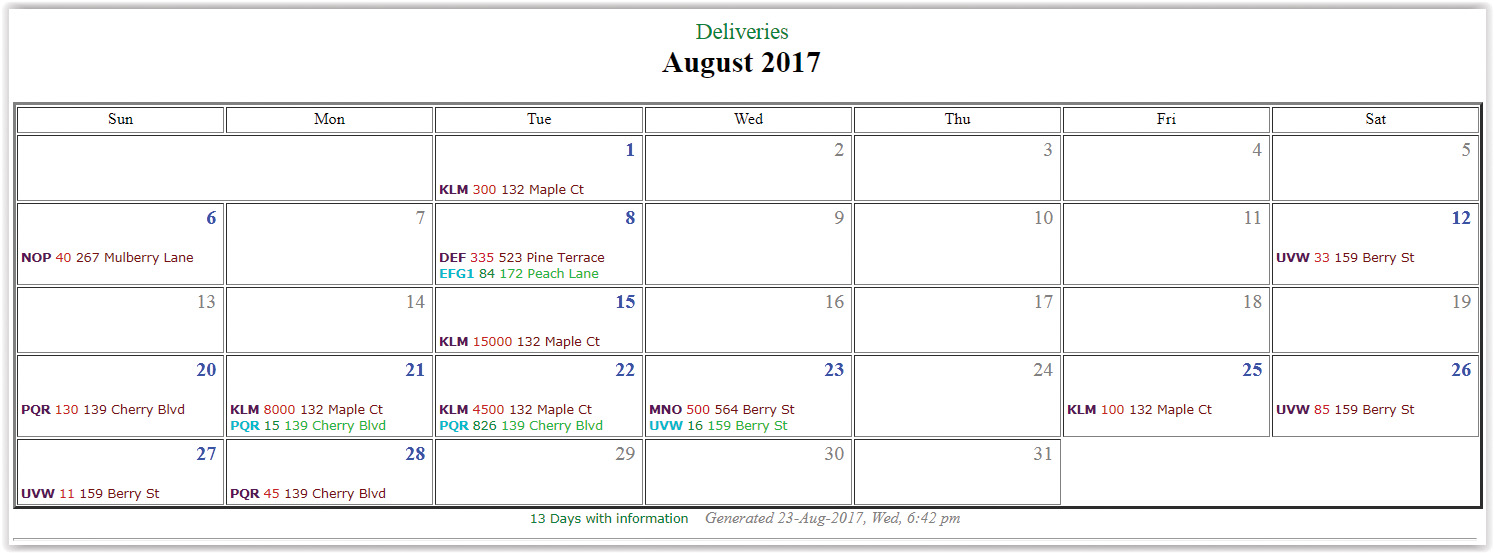
The query name you entered gets passed as a parameter to the Create_HtmlCalendar function, which is VBA code to create the calendar you see in Figure 2. And that’s it! You have a calendar for the month. The calendar is created as an HTML file that opens in a web browser, making it very easy to share with anyone outside of Access. By default, the calendars are saved in a Calendar subfolder in whatever location the database is saved in.
Download this month’s database: sf_17-09_Database_HTML_Calendar.
SF SAYS
With the calendar tool and a query containing the correct field aliases, you can quickly create a calendar to share with others.

September 2017


